Difference between revisions of "Formlabs 3D Printer"
| (10 intermediate revisions by the same user not shown) | |||
| Line 22: | Line 22: | ||
[[{{#show: {{FULLPAGENAME}}|?Has icon|link=none}}|140px|left|{{#show: {{FULLPAGENAME}}|?Has icondesc}}]] | [[{{#show: {{FULLPAGENAME}}|?Has icon|link=none}}|140px|left|{{#show: {{FULLPAGENAME}}|?Has icondesc}}]] | ||
| − | [[File:Form 3.webp| | + | [[File:Form 3.webp|450px|right]] |
Make: {{#show: {{PAGENAME}} |?Has make}} | Make: {{#show: {{PAGENAME}} |?Has make}} | ||
| Line 54: | Line 54: | ||
<gallery> | <gallery> | ||
| − | File: | + | File:Touchscreen.png|Touchscreen |
File:...resinCartridge.jpg|Resin Cartridge | File:...resinCartridge.jpg|Resin Cartridge | ||
File:...form2BuildPlate.jpg|Build Platform | File:...form2BuildPlate.jpg|Build Platform | ||
| Line 90: | Line 90: | ||
##Every part that needs support should have support - PreForm will highlight unsupported areas in red, place supports until the red areas go away. '''Check the part thoroughly because PreForm will not let you print with unsupported areas.''' | ##Every part that needs support should have support - PreForm will highlight unsupported areas in red, place supports until the red areas go away. '''Check the part thoroughly because PreForm will not let you print with unsupported areas.''' | ||
##Supports can be added, edited, and removed in the PreForm Supports tab. | ##Supports can be added, edited, and removed in the PreForm Supports tab. | ||
| − | ###Support density should be between .5 and .7. | + | ###Support density should be between .5 and .7. This setting determines how many supports are placed per unit area of your print's surface. |
| + | ####Higher density → more supports, stronger holding power, better for tall, heavy, or delicate parts, but harder post-processing. | ||
| + | ####Lower density → fewer supports, easier cleanup, less resin use, but higher risk of part shifting or warping. | ||
###Support point size should be between .6mm and .8mm. | ###Support point size should be between .6mm and .8mm. | ||
###These values can be edited if necessary to ensure printability, just use common sense when adjusting values. | ###These values can be edited if necessary to ensure printability, just use common sense when adjusting values. | ||
| Line 112: | Line 114: | ||
#Operating the Touchscreen | #Operating the Touchscreen | ||
##You will be able to start your print using the touchscreen on the Form 3. If it is sleeping, just press the button and it should wake up. | ##You will be able to start your print using the touchscreen on the Form 3. If it is sleeping, just press the button and it should wake up. | ||
| − | ##When it wakes up, you will likely see this screen. It displays the most recently prepared job and gives you the option to print now by pressing the blue button on the bottom right of the screen.[[File: | + | ##When it wakes up, you will likely see this screen. It displays the most recently prepared job and gives you the option to print now by pressing the blue button on the bottom right of the screen.[[File:Touchscreen.png|none|thumb]] |
##There are two other buttons you can press on the left screen. The USB button will take you to the settings of the printer, so you will not need to go here. The checklist button brings a list of every job that has been uploaded to the printer, so you will want to be selecting this one to find your print. When you find your print, select "print now". The printer will make sure that you perform the appropriate setup before it starts printing, such as inserting the tank in the back of the printer and assuring that the build plate is cleared of other printed parts. | ##There are two other buttons you can press on the left screen. The USB button will take you to the settings of the printer, so you will not need to go here. The checklist button brings a list of every job that has been uploaded to the printer, so you will want to be selecting this one to find your print. When you find your print, select "print now". The printer will make sure that you perform the appropriate setup before it starts printing, such as inserting the tank in the back of the printer and assuring that the build plate is cleared of other printed parts. | ||
##The print will begin its process once you hit Print Now! A time estimate will be provided. | ##The print will begin its process once you hit Print Now! A time estimate will be provided. | ||
Latest revision as of 09:05, 12 August 2025
Make: Formlabs
Model: Form 3
Serial Number:
Ace: Spencer Monkewicz (smonkewicz22@georgefox.edu).
Location: Prototype Lab
Description
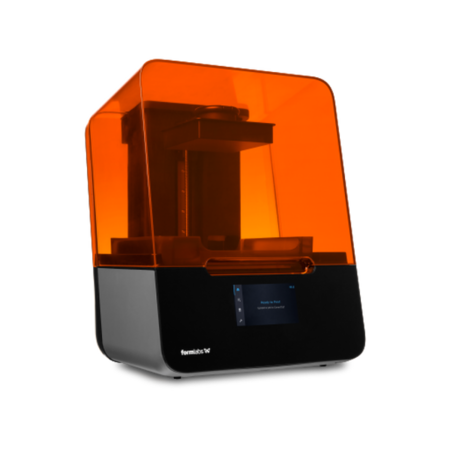
The Form 3 is Formlab's 3rd generation printer boasting a whole range of new features including a new peeling mechanism, heated tank, touchscreen display, wireless controls and an automated resin system. The resulting prints that come off of the Form 3 have consistently been among the highest quality objects to come off of any desktop 3D printer. This machine is best used with the Form Wash and Cure [1]
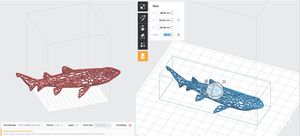
The Form 3 employs SLA Printing (Stereolithography Apparatus). Due to friction caused by de-laminating every layer, every part should be canted in its orientation. This means the part should be angled in the PreForm software to reduce the cross sectional area needing to be shifted to de-laminate each layer. This ensures the wiper blade in the resin tank doesn't remove the print from the build plate. When reviewing the supports in PreForm, check to make sure all supports are created in areas from which they can be easily removed, or that supports created in inaccessible areas won't interfere with the print's intended function. Also check to make sure no supports are created on hard edges, as any placed supports will break up the edge, and removing them properly takes longer than necessary and can potentially damage the print.
Documentation
Terminology
Training
Operation
The Form 3 is most useful for its ability to print incredibly accurate parts, with layers as thin as .025mm thick, depending on the resin selected. Due to the size of the Form 3, it can only be used to print smaller pieces, and the extra layering for detail combined with the de-lamination process also causes the Form 3 to generally be the slowest printer in the lab. Unless an exception is made, a model with supports included should be no larger than 30mL worth of resin. If specific material properties are needed for a print, the Form 3 is a good option to look into thanks to the many differing resins available for use.
Demonstration
To show a complete understanding of the Form 3, students will prepare a part, upload it to the Form 3, and print it.
General Procedure
- Setting up PreForm
- PreForm is the software we will use to import or model to the printer. When connecting to PreForm you need to make sure the wifi is enabled and connected to Bruin Secure. Make sure the correct printer is selected as well.
- If a window pops up saying the print is broken, hit the repair button then proceed as normal.
- Parts must be shrunk to fit within the build area, further size edits can be made in the Size tab.
- The goal is to reduce the horizontal area covered with each pass of the wiper. Start with auto-orienting the part using the 'Orient Selected' button in the Orientation tab, this is a good place to start and will make it easier to see if the part needs further orientation.
- Don't place supports on hard edges (right angles) or in inaccessible places. This will cause the print to be unprintable.
- Every part that needs support should have support - PreForm will highlight unsupported areas in red, place supports until the red areas go away. Check the part thoroughly because PreForm will not let you print with unsupported areas.
- Supports can be added, edited, and removed in the PreForm Supports tab.
- Support density should be between .5 and .7. This setting determines how many supports are placed per unit area of your print's surface.
- Higher density → more supports, stronger holding power, better for tall, heavy, or delicate parts, but harder post-processing.
- Lower density → fewer supports, easier cleanup, less resin use, but higher risk of part shifting or warping.
- Support point size should be between .6mm and .8mm.
- These values can be edited if necessary to ensure printability, just use common sense when adjusting values.
- Support density should be between .5 and .7. This setting determines how many supports are placed per unit area of your print's surface.
- The Layout tab can be used to add additional copies of a part.
- Ensure you are connected to Bruin Secure wifi with the proper printer and resin type selected in Preform prior to printing. Additionally, make sure that the resin you want is already installed in the printers. If the resin needs to be changed to the one that you want, ask a Lab Volunteer to help you.
- Choosing a Resin Type
- Go through each of these resin types to evaluate which material you will make your part out of. Once you have finished, you can send the file from the computer to the Formlabs printer
- Black/grey standard: the Standard Resins section of Choosing the Right Material.
- Pros: high detail, matte surfaces, good for small, intricate features.
- Cons: not particularly strong, stretchy, or flexible.
- Tough: Tough
- Pros: good for hard edges, snap fits, and high-stresses.
- Cons: bad for fine details and rigid prints, will not stretch as much as Durable.
- Durable: Durable
- Pros: low-friction, high impact strength, good for parts that are both rigid and flexible.
- Cons: bad for fine detail parts.
- Flexible: Flexible
- Pros: can simulate rubber when uncured, good for functional prototyping.
- Cons: bad for fine detail or applications when rigidity or hardness are required.
- See the respective links for each resin for in-depth descriptions of each resin's properties and suggested applications, or look at Choosing the Right Material for a shorter overview. Most resins do not handle high temperatures or constant loading well.
- Operating the Touchscreen
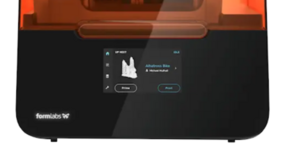
- You will be able to start your print using the touchscreen on the Form 3. If it is sleeping, just press the button and it should wake up.
- When it wakes up, you will likely see this screen. It displays the most recently prepared job and gives you the option to print now by pressing the blue button on the bottom right of the screen.
- There are two other buttons you can press on the left screen. The USB button will take you to the settings of the printer, so you will not need to go here. The checklist button brings a list of every job that has been uploaded to the printer, so you will want to be selecting this one to find your print. When you find your print, select "print now". The printer will make sure that you perform the appropriate setup before it starts printing, such as inserting the tank in the back of the printer and assuring that the build plate is cleared of other printed parts.
- The print will begin its process once you hit Print Now! A time estimate will be provided.
- Removing Prints
- Your part should now be finished! Follow these steps to clean it up.
- Finished prints
- Use a scraping tool to remove the print and any extra material from the build plate, taking care to not scratch the build plate. Go as carefully and as slowly as needed to prevent damaging the print.
- The build plate stand can be used for easier removal.
- Wash the print in the Form Wash.
- If the print is being cured, only remove support material after it has been run through the Form Cure.
- Supports should be clipped off, and any leftover support material can be sanded down if desired.
- Use a scraping tool to remove the print and any extra material from the build plate, taking care to not scratch the build plate. Go as carefully and as slowly as needed to prevent damaging the print.
- Failed prints
- Follow the same process for finished prints for removing.
- When a print fails, the build plate must be cleaned and run through the Wash before a new print can be started, as leftover residue from the failed print can cause subsequent prints to also fail. You will also need to check the resin tank for clumps as well as double check the model orientation. Don't forget to update the job log as well.
- Washing and Curing Prints
- See the Form Wash and Cure page.
- Changing Resin
- If the Formlabs Printer resin tray does not contain the resin you want, allow Lab volunteers to provide the desired resin.
- Remove, clean, and replace the build plate.
- Pull lever holding build plate in place up, allowing the build plate to be removed.
- Place the build plate on the holding rack in the Form Wash. Run the build plate through the Wash to remove resin. For the build plate, the Wash should be set to 10 minutes.
- Let the build plate air dry before replacing, secure by flipping lever down.
- Remove and replace resin tank and wiper.
- Firmly pull tank back towards the touch screen until it pops loose of the printer.
- Place the tank in the appropriately labeled tank storage container in the cabinet under the printer.
- Remove the desired tank from the storage container and place the container back in the cabinet.
- Slot the new resin tank into place in the printer by putting it in and sliding it towards the back of the machine.
- Use a scraping tool to dredge bottom of new resin tank for any hardened resin or loose bits of material, remove any found bits.
- Be sure to clean up any resin that spills during this process.
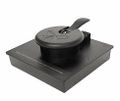
- Remove and replace the resin cartridge in the back of the printer.
- Close the lid of the cartridge if it's open.
- Pull cartridge out of the printer.
- Wipe dry the resin drip on the bottom of the cartridge, then store.
- Insert new resin cartridge, of the same resin as the tank.
- Open lid on resin cartridge before starting a print, and close after.
Safety
The most dangerous part of using the Form 3 is taking the part off of the build plate. The scraping tool could hurt your little fingers, so make sure you do not hit them. Also, the alcohol used to clean the print is not for drinking purposes. It is both against the lifestyle contract and very harmful to you if you drink it, so do not do it.
Approved Resins
Please use the available resins:
- Photopolymer Resin
- Durable
- Tough
- Elastic
- Tough 1500 V1
- Tough 2000 V1
- Flexible 80A V1
- Flexible V2
- High Temp V2
- Gray V4
- White V4
- Ceramic
- Castable Wax
NOTE: If you have a different resin that you would like to use, please talk to Justin.
Certification
Complete the Machine Shop - Formlabs 3D Printer Module at the link below to gain access to the Formlabs 3D Printer. The Maker Hub Canvas course pertains to all facilities and equipment contained in the Maker Hub; simply complete the quizzes for the facilities/equipment you wish to use in the Maker Hub. Please email makerhub@georgefox.edu if you have any questions.
Troubleshooting
If a print fails, the most likely cause is contamination of the resin. Before proceeding, see the procedure for Failed Prints. Contamination of the resin involves leftover material on the build plate, or particulates in the resin tank. Before attempting a new print, thoroughly clean the build plate, and dredge the resin tank for any loose particles. Another cause is incorrect orientation of the print. Check the print file in question, and ensure it has been canted accordingly to prevent the de-laminating process from removing the print from the build plate. Make sure to also update the job log.
Old resin and resin tanks can also present issues. Don't ever mix resin types. If a resin tanks is particularly cloudy on the bottom, the laser will be prevented from being able to penetrate the tank, and cause adhesion issues for the print. Resin can also go bad after sitting for long periods of time or being used heavily. This can be evidenced by discoloration of the resin or separation of the resin into unmixed layers.
Maintenance
General maintenance
- Dredging: Every few prints the resin tank should be checked and dredged with a scraping tool to search for any hardened resin or loose bits of material, as well as when resin tanks are switched out, and when a print fails. Remove any found bits. Dredging is done by sweeping a scraping tool back and forth across the bottom of the resin tank, essentially mixing up the resin to stir up any loose bits. Take care while dredging to not scrape the tank. See a resin's particular page on the Formlabs website for additional cleaning instruction. If the tank is not cleanable, switch out the resin tank. If the problem persists, it's possible the resin cartridge needs to be switched out as well.
- Alcohol in the Form Wash must be changed once a certain threshold of washed-off resin enters the tank. See the Form Wash and Cure page for details.
- Old resin and resin tanks will occasionally need to be changed out
- Form 2 Sources and Help
Specific Maintenance Tasks
| Maintenance Procedure | Frequency | Done By |
|---|---|---|
| Dredging | Every few prints | Lab Volunteer |
| Changing Alcohol | Once a certain threshold of washed-off resin enters the tank. See the Form Wash and Cure page for details. | Lab Volunteer |
| General Cleaning | Before and after each use. Reset The Space! | Student |
Resources
Link to shop Equipment page


